> ## Documentation Index
> Fetch the complete documentation index at: https://langchain-5e9cc07a-preview-update-1770920925-e15dbde.mintlify.site/llms.txt
> Use this file to discover all available pages before exploring further.
# User management
This page covers user management features in LangSmith, including access control, authentication, and automated user provisioning:
* [Set up access control](#set-up-access-control): Configure role-based access control (RBAC) to manage user permissions within workspaces, including creating custom roles and assigning them to users.
* [SAML SSO (Enterprise plan)](#set-up-saml-sso-for-your-organization): Set up Single Sign-On authentication for Enterprise customers using SAML 2.0, including configuration for popular identity providers.
* [SCIM User Provisioning (Enterprise plan)](#set-up-scim-for-your-organization): Automate user provisioning and deprovisioning between your identity provider and LangSmith using SCIM.
## Set up access control
RBAC (Role-Based Access Control) is a feature that is only available to Enterprise customers. If you are interested in this feature, [contact our sales team](https://www.langchain.com/contact-sales). Other plans default to using the [`Admin` role](/langsmith/administration-overview) for all users.
You may find it helpful to read the [Administration overview](/langsmith/administration-overview) page before setting up access control.
LangSmith relies on RBAC to manage user permissions within a [workspace](/langsmith/administration-overview#workspaces). This allows you to control who can access your LangSmith workspace and what they can do within it. Only users with the `workspace:manage` permission can manage access control settings for a workspace.
For a complete reference of workspace roles and their permissions, refer to the [Role-based access control](/langsmith/rbac#workspace-roles) guide. For specific operations each role can perform, refer to the [Organization and workspace operations reference](/langsmith/organization-workspace-operations).
### Create a role
By default, LangSmith comes with a set of system roles:
* `Admin`: has full access to all resources within the workspace.
* `Viewer`: has read-only access to all resources within the workspace.
* `Editor`: has full permissions except for workspace management (adding/removing users, changing roles, configuring service keys).
If these do not fit your access model, `Organization Admins` can create custom roles to suit your needs.
To create a role, navigate to the **Roles** tab in the **Members and roles** section of the [Organization settings page](https://smith.langchain.com/settings). Note that new roles that you create will be usable across all workspaces within your organization.
Click on the **Create Role** button to create a new role. A **Create role** form will open.
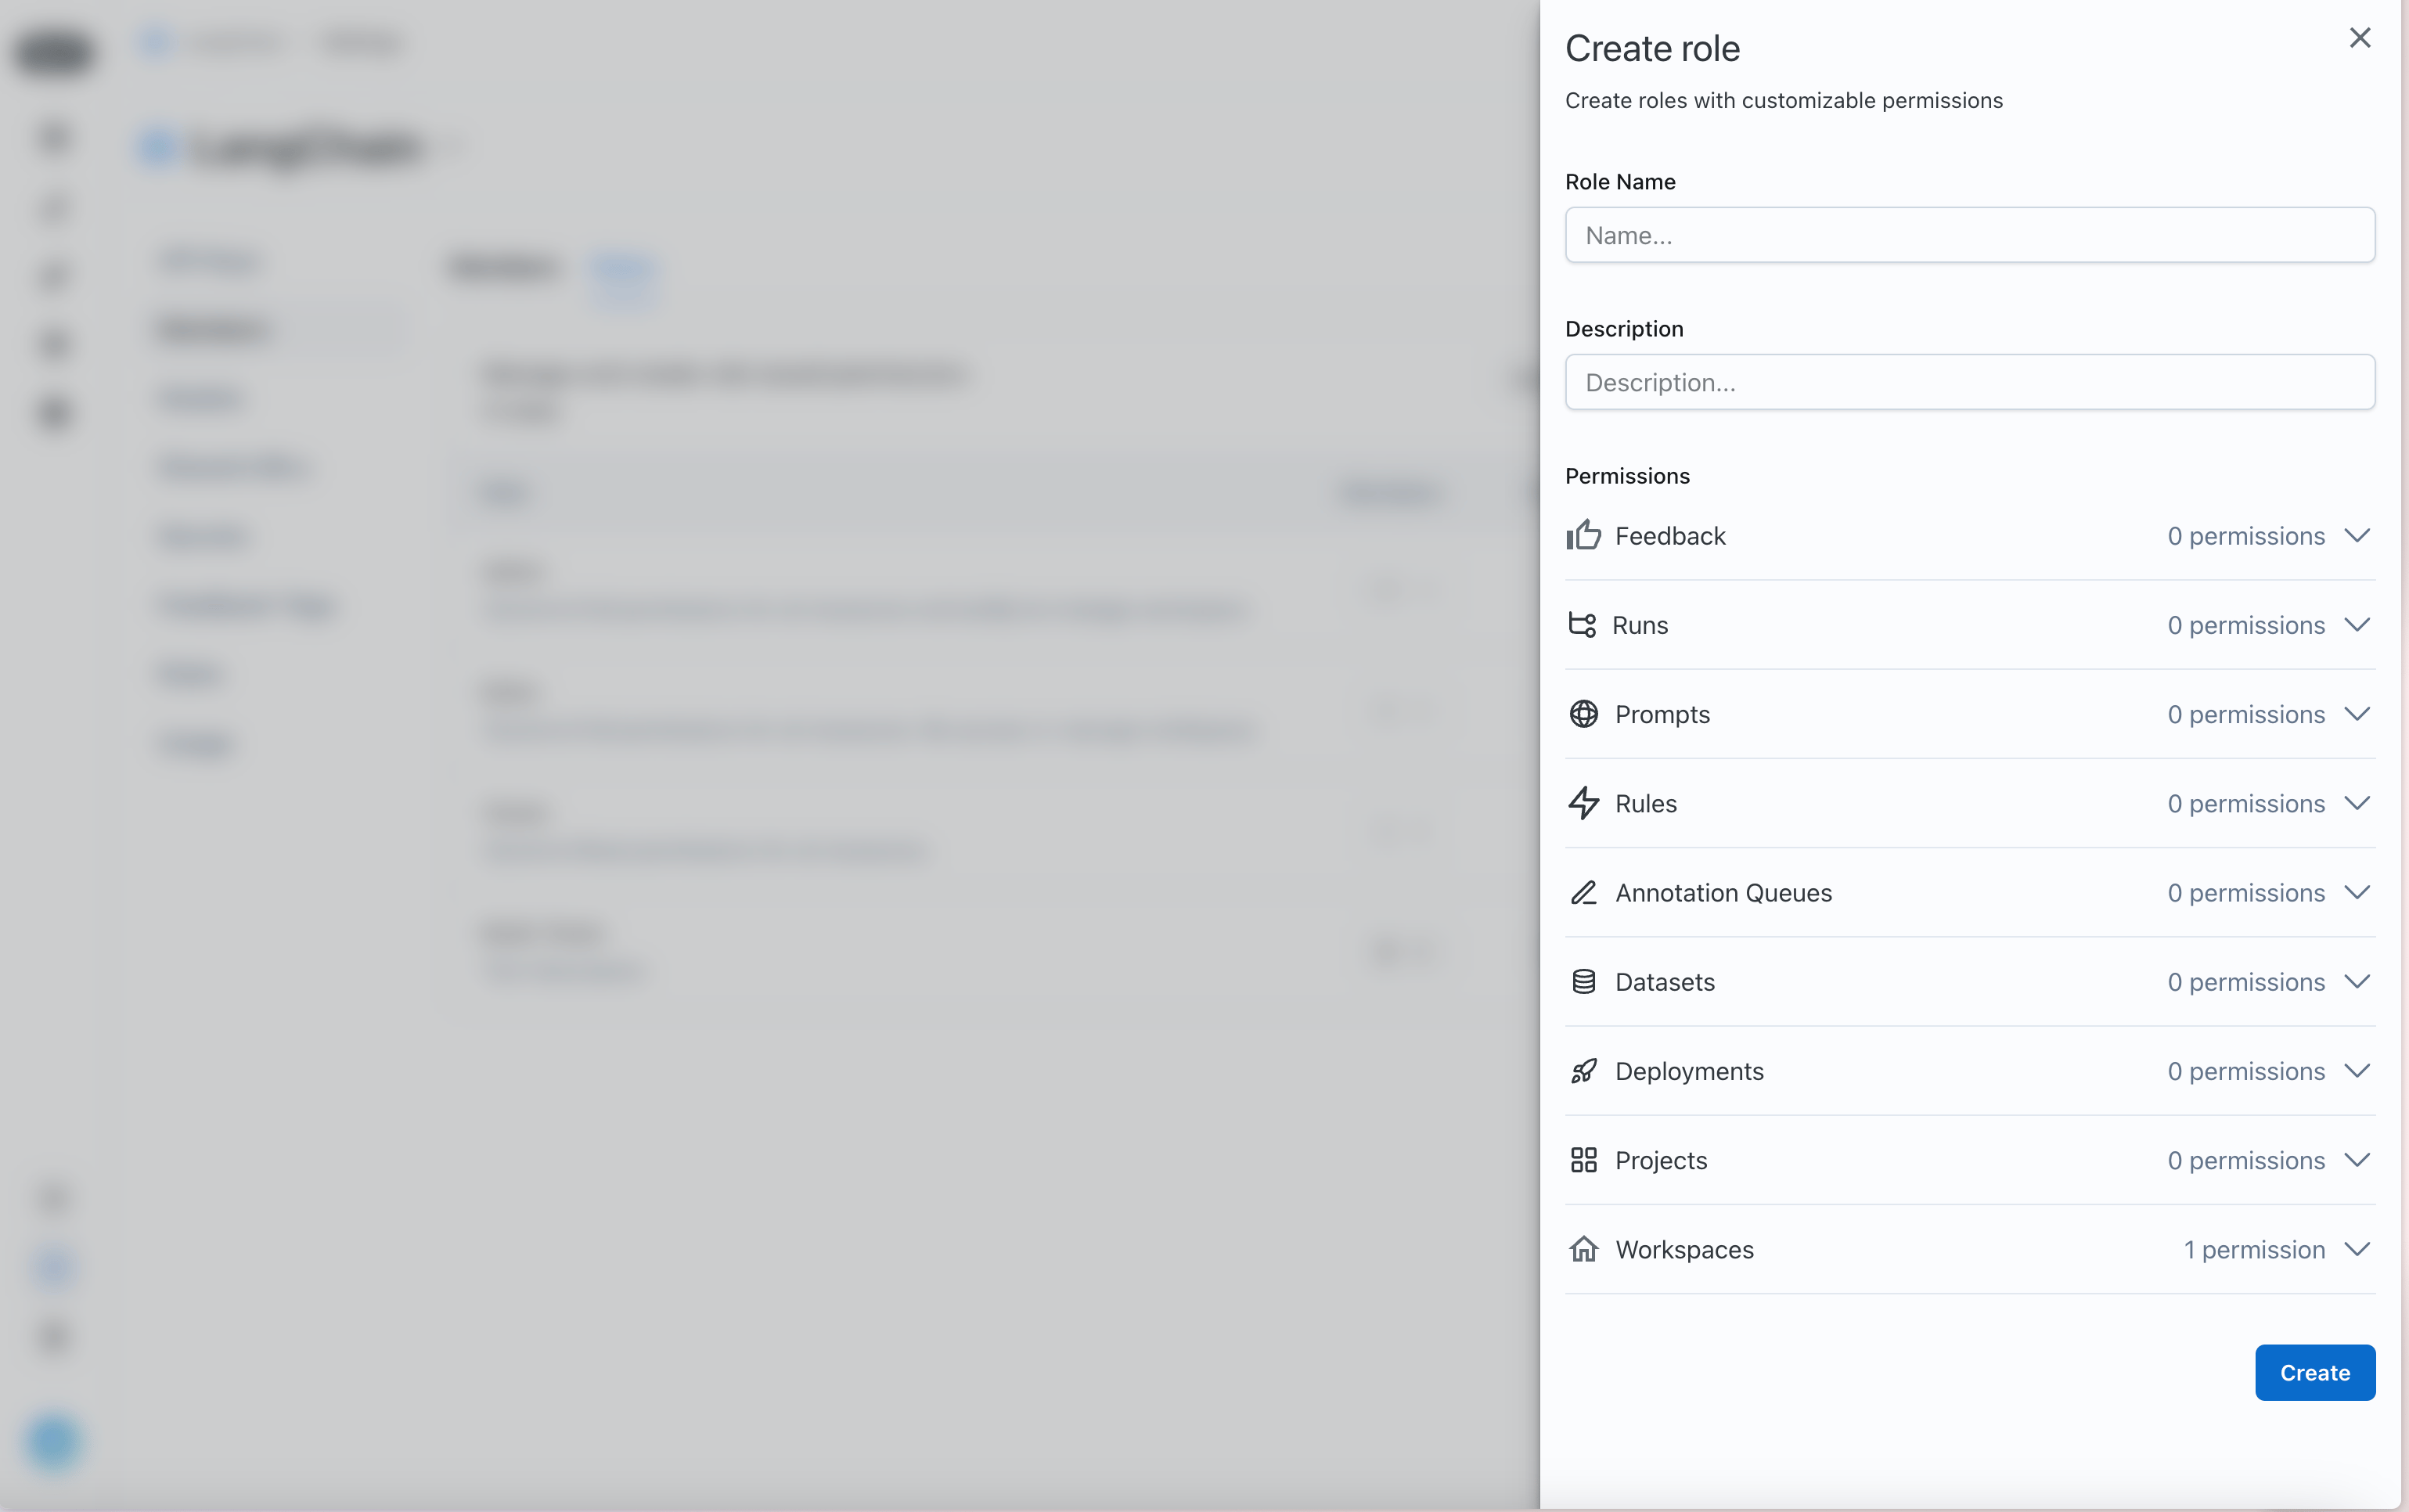 Assign permissions for the different LangSmith resources that you want to control access to.
### Assign a role to a user
Once you have your roles set up, you can assign them to users. To assign a role to a user, navigate to the `Workspace members` tab in the `Workspaces` section of the [Organization settings page](https://smith.langchain.com/settings)
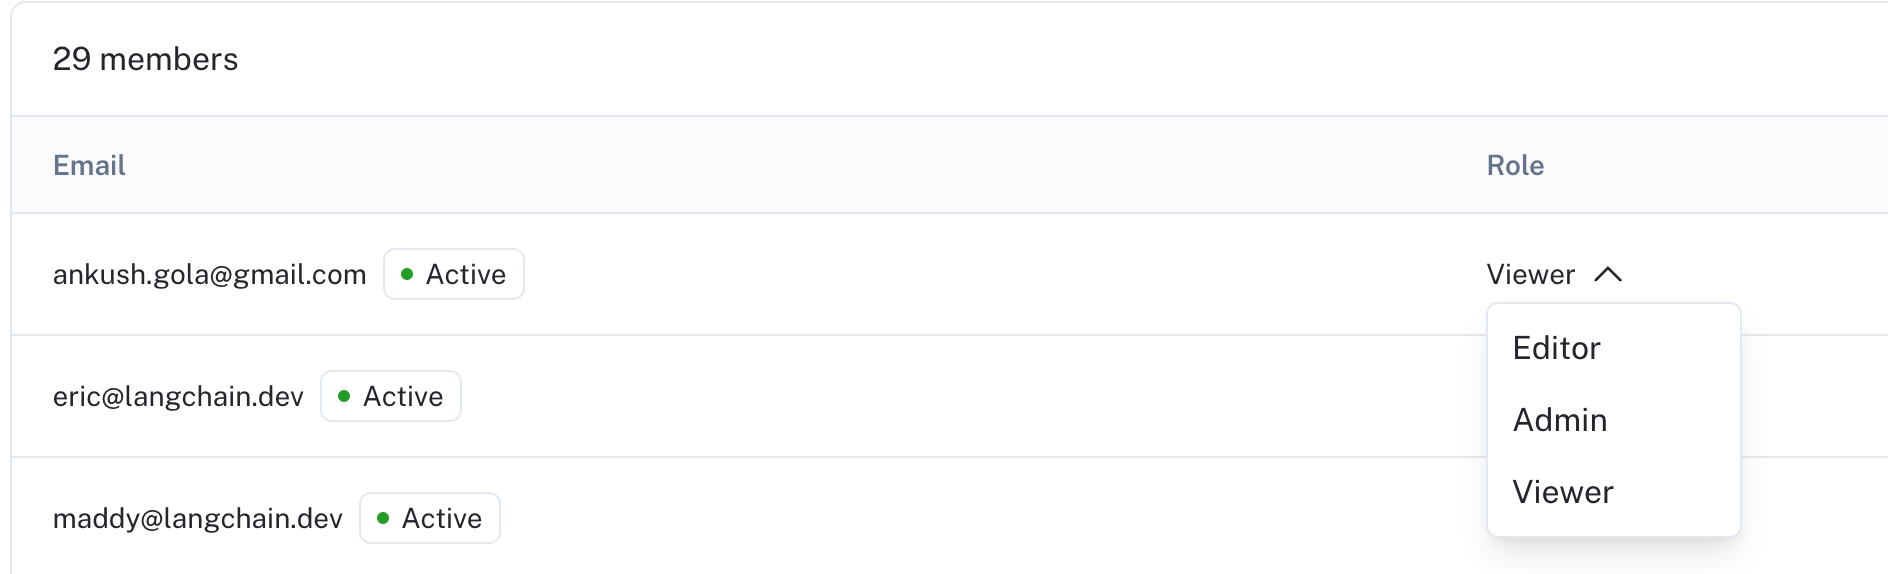
Each user will have a **Role** dropdown that you can use to assign a role to them.
Assign permissions for the different LangSmith resources that you want to control access to.
### Assign a role to a user
Once you have your roles set up, you can assign them to users. To assign a role to a user, navigate to the `Workspace members` tab in the `Workspaces` section of the [Organization settings page](https://smith.langchain.com/settings)
Each user will have a **Role** dropdown that you can use to assign a role to them.
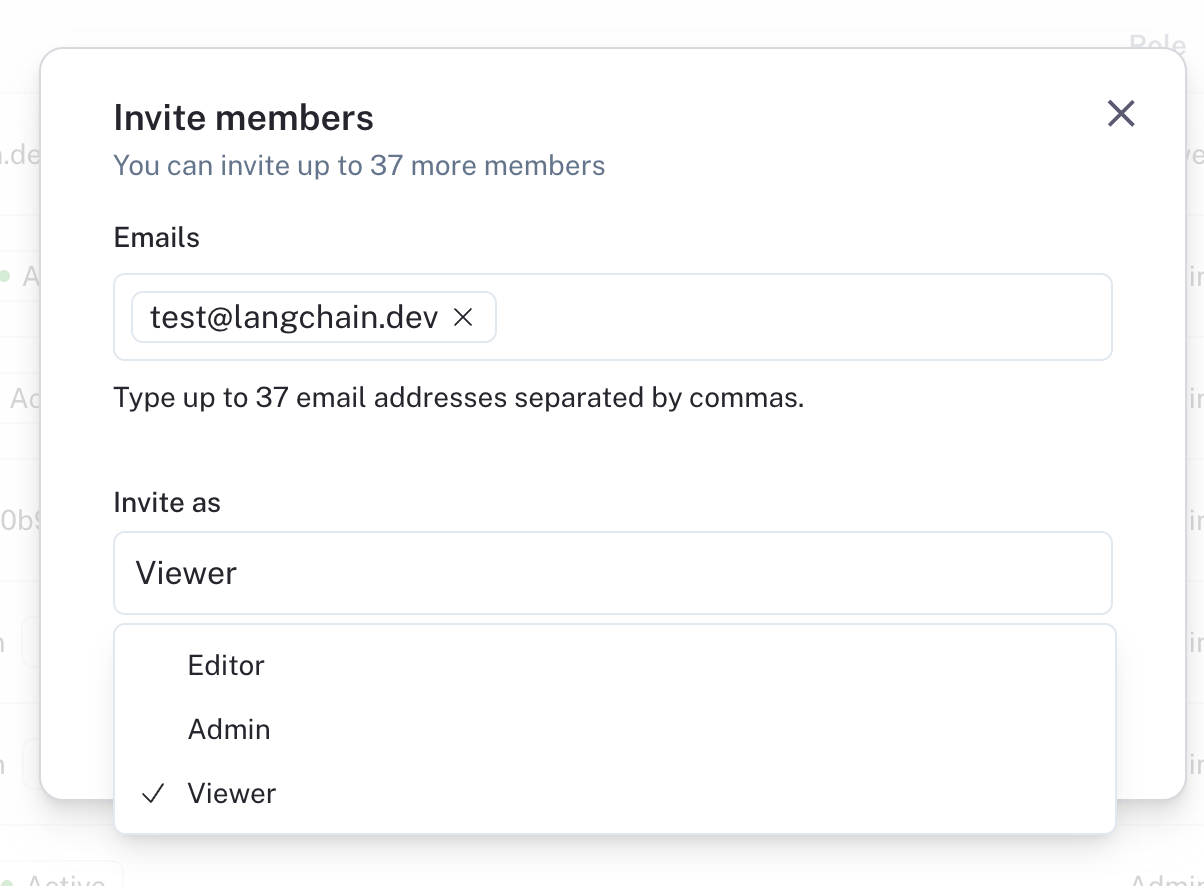
 You can also invite new users with a given role.
 ## Set up SAML SSO for your organization
Single Sign-On (SSO) functionality is **available for Enterprise Cloud** customers to access LangSmith through a single authentication source. This allows administrators to centrally manage team access and keeps information more secure.
LangSmith's SSO configuration is built using the SAML (Security Assertion Markup Language) 2.0 standard. SAML 2.0 enables connecting an Identity Provider (IdP) to your organization for an easier, more secure login experience.
SSO services permit a user to use one set of credentials (for example, a name or email address and password) to access multiple applications. The service authenticates the end user only once for all the applications the user has been given rights to and eliminates further prompts when the user switches applications during the same session. The benefits of SSO include:
* Streamlines user management across systems for organization owners.
* Enables organizations to enforce their own security policies (e.g., MFA).
* Removes the need for end users to remember and manage multiple passwords. Simplifies the end-user experience, by allowing sign in at one single access point across multiple applications.
### Just-in-time (JIT) provisioning
LangSmith supports Just-in-time provisioning when using SAML SSO. This allows someone signing in via SAML SSO to join the organization and selected workspaces automatically as a member.
JIT provisioning only runs for new users, that is, users who do not already have access to the organization with the same email address via a [different login method](/langsmith/authentication-methods#cloud).
### Login methods and access
Once you have completed your configuration of SAML SSO for your organization, users will be able to log in via SAML SSO in addition to [other login methods](/langsmith/authentication-methods#cloud), such as username/password or Google Authentication":
* When logged in via SAML SSO, users can only access the corresponding organization with SAML SSO configured.
* Users with SAML SSO as their only login method do not have [personal organizations](/langsmith/administration-overview#organizations).
* When logged in via any other method, users can access the organization with SAML SSO configured along with any other organizations they are a part of.
### Enforce SAML SSO only
User invites are not supported in organizations enforcing SAML SSO only. Initial workspace membership and role is determined by JIT provisioning, and changes afterwards can be managed in the UI.
For additional flexibility in automated user management, LangSmith supports SCIM.
To ensure users can only access the organization when logged in using SAML SSO and no other method, check the **Login via SSO only** checkbox and click **Save**. Once this happens, users accessing the organization that are logged-in via a non-SSO login method are required to log back in using SAML SSO. This setting can be switched back to allow all login methods by unselecting the checkbox and clicking **Save**.
You must be logged in via SAML SSO in order to update this setting to `Only SAML SSO`. This is to ensure the SAML settings are valid and avoid locking users out of your organization.
For troubleshooting, refer to the [SAML SSO FAQs](/langsmith/faq#saml-sso-faqs). If you have issues setting up SAML SSO, contact the LangChain support team via [support.langchain.com](https://support.langchain.com).
### Prerequisites
SAML SSO is available for organizations on the [Enterprise plan](https://www.langchain.com/pricing-langsmith). Please [contact sales](https://www.langchain.com/contact-sales) to learn more.
* Your organization must be on an Enterprise plan.
* Your Identity Provider (IdP) must support the SAML 2.0 standard.
* Only [`Organization Admins`](/langsmith/organization-workspace-operations#sso-and-authentication) can configure SAML SSO.
For instructions on using SCIM along with SAML for user provisioning and deprovisioning, refer to the [SCIM setup](#set-up-scim-for-your-organization).
### Initial configuration
For IdP-specific configuration steps, refer to one of the following:
* [Entra ID](#entra-id-azure)
* [Google](#google)
* [Okta](#okta)
1. In your IdP: Configure a SAML application with the following details, then copy the metadata URL or XML for step 3.
The following URLs are different for the US and EU regions. Ensure you select the correct link.
1. Single sign-on URL (or ACS URL):
* US: [https://auth.langchain.com/auth/v1/sso/saml/acs](https://auth.langchain.com/auth/v1/sso/saml/acs)
* EU: [https://eu.auth.langchain.com/auth/v1/sso/saml/acs](https://eu.auth.langchain.com/auth/v1/sso/saml/acs)
2. Audience URI (or SP Entity ID):
* US: [https://auth.langchain.com/auth/v1/sso/saml/metadata](https://auth.langchain.com/auth/v1/sso/saml/metadata)
* EU: [https://eu.auth.langchain.com/auth/v1/sso/saml/metadata](https://eu.auth.langchain.com/auth/v1/sso/saml/metadata)
3. Name ID format: email address.
4. Application username: email address.
5. Required claims: `sub` and `email`.
2. In LangSmith: Go to **Settings** -> **Members and roles** -> **SSO Configuration**. Fill in the required information and submit to activate SSO login:
1. Fill in either the `SAML metadata URL` or `SAML metadata XML`.
2. Select the `Default workspace role` and `Default workspaces`. New users logging in via SSO will be added to the specified workspaces with the selected role.
* `Default workspace role` and `Default workspaces` are editable. The updated settings will apply to new users only, not existing users.
* (Coming soon) `SAML metadata URL` and `SAML metadata XML` are editable. This is usually only necessary when cryptographic keys are rotated/expired or the metadata URL has changed but the same IdP is still used.
### Entra ID (Azure)
For additional information, see Microsoft's [documentation](https://learn.microsoft.com/en-us/entra/identity/enterprise-apps/add-application-portal-setup-sso).
**Step 1: Create a new Entra ID application integration**
1. Log in to the [Azure portal](https://portal.azure.com/#home) with a privileged role (e.g., `Global Administrator`). On the left navigation pane, select the `Entra ID` service.
2. Navigate to **Enterprise Applications** and then select **All Applications**.
3. Click **Create your own application**.
4. In the **Create your own application** window:
1. Enter a name for your application (e.g., `LangSmith`).
2. Select **Integrate any other application you don't find in the gallery (Non-gallery)**.
5. Click **Create**.
**Step 2: Configure the Entra ID application and obtain the SAML Metadata**
1. Open the enterprise application that you created.
2. In the left-side navigation, select **Manage** > **Single sign-on**.
3. On the Single sign-on page, click **SAML**.
4. Update the **Basic SAML Configuration**:
1. `Identifier (Entity ID)`:
* US: [https://auth.langchain.com/auth/v1/sso/saml/metadata](https://auth.langchain.com/auth/v1/sso/saml/metadata)
* EU: [https://eu.auth.langchain.com/auth/v1/sso/saml/metadata](https://eu.auth.langchain.com/auth/v1/sso/saml/metadata)
2. `Reply URL (Assertion Consumer Service URL)`:
* US: [https://auth.langchain.com/auth/v1/sso/saml/acs](https://auth.langchain.com/auth/v1/sso/saml/acs)
* EU: [https://eu.auth.langchain.com/auth/v1/sso/saml/acs](https://eu.auth.langchain.com/auth/v1/sso/saml/acs)
3. Leave `Relay State`, `Logout Url`, and `Sign on URL` empty.
4. Click **Save**.
5. Ensure required claims are present with **Namespace**: `http://schemas.xmlsoap.org/ws/2005/05/identity/claims`:
1. `sub`: `user.objectid`.
2. `emailaddress`: `user.userprincipalname` or `user.mail` (if using the latter, ensure all users have the `Email` field filled in under `Contact Information`).
3. (Optional) For SCIM, see the [setup documentation](/langsmith/user-management) for specific instructions about `Unique User Identifier (Name ID)`.
6. On the SAML-based Sign-on page, under **SAML Certificates**, copy the **App Federation Metadata URL**.
**Step 3: Set up LangSmith SSO Configuration**
Follow the instructions under [initial configuration](#initial-configuration) in the `Fill in required information` step, using the metadata URL from the previous step.
**Step 4: Verify the SSO setup**
1. Assign the application to users/groups in Entra ID:
1. Select **Manage** > **Users and groups**.
2. Click **Add user/group**.
3. In the **Add Assignment** window:
1. Under **Users**, click **None Selected**.
2. Search for the user you want to assign to the enterprise application, and then click **Select**.
3. Verify that the user is selected, and click **Assign**.
2. Have the user sign in via the unique login URL from the **SSO Configuration** page, or go to **Manage** > **Single sign-on** and select **Test single sign-on with (application name)**.
### Google
For additional information, see Google's [documentation](https://support.google.com/a/answer/6087519).
**Step 1: Create and configure the Google Workspace SAML application**
1. Make sure you're signed into an administrator account with the appropriate permissions.
2. In the Admin console, go to **Menu** -> **Apps** -> **Web and mobile apps**.
3. Click **Add App** and then **Add custom SAML app**.
4. Enter the app name and, optionally, upload an icon. Click **Continue**.
5. On the Google Identity Provider details page, download the **IDP metadata** and save it for Step 2. Click **Continue**.
6. In the `Service Provider Details` window, enter:
1. `ACS URL`:
* US: [https://auth.langchain.com/auth/v1/sso/saml/acs](https://auth.langchain.com/auth/v1/sso/saml/acs)
* EU: [https://eu.auth.langchain.com/auth/v1/sso/saml/acs](https://eu.auth.langchain.com/auth/v1/sso/saml/acs)
2. `Entity ID`:
* US: [https://auth.langchain.com/auth/v1/sso/saml/metadata](https://auth.langchain.com/auth/v1/sso/saml/metadata)
* EU: [https://eu.auth.langchain.com/auth/v1/sso/saml/metadata](https://eu.auth.langchain.com/auth/v1/sso/saml/metadata)
3. Leave `Start URL` and the `Signed response` box empty.
4. Set `Name ID` format to `EMAIL` and leave `Name ID` as the default (`Basic Information > Primary email`).
5. Click `Continue`.
7. Use `Add mapping` to ensure required claims are present:
1. `Basic Information > Primary email` -> `email`
**Step 2: Set up LangSmith SSO Configuration**
Follow the instructions under [initial configuration](#initial-configuration) in the `Fill in required information` step, using the `IDP metadata` from the previous step as the metadata XML.
**Step 3: Turn on the SAML app in Google**
1. Select the SAML app under `Menu -> Apps -> Web and mobile apps`
2. Click `User access`.
3. Turn on the service:
1. To turn the service on for everyone in your organization, click `On for everyone`, and then click `Save`.
2. To turn the service on for an organizational unit:
1. At the left, select the organizational unit then `On`.
2. If the Service status is set to `Inherited` and you want to keep the updated setting, even if the parent setting changes, click `Override`.
3. If the Service status is set to `Overridden`, either click `Inherit` to revert to the same setting as its parent, or click `Save` to keep the new setting, even if the parent setting changes.
3. To turn on a service for a set of users across or within organizational units, select an access group. For details, go to [Use groups to customize service access](https://support.google.com/a/answer/9050643).
4. Ensure that the email addresses your users use to sign in to LangSmith match the email addresses they use to sign in to your Google domain.
**Step 4: Verify the SSO setup**
Have a user with access sign in via the unique login URL from the **SSO Configuration** page, or go to the SAML application page in Google and click **TEST SAML LOGIN**.
### Okta
#### Supported features
* IdP-initiated SSO (Single Sign-On)
* SP-initiated SSO
* Just-In-Time provisioning
* Enforce SSO only
#### Configuration steps
For additional information, see Okta's [documentation](https://help.okta.com/en-us/content/topics/apps/apps_app_integration_wizard_saml.htm).
**Step 1: Create and configure the Okta SAML application**
## Set up SAML SSO for your organization
Single Sign-On (SSO) functionality is **available for Enterprise Cloud** customers to access LangSmith through a single authentication source. This allows administrators to centrally manage team access and keeps information more secure.
LangSmith's SSO configuration is built using the SAML (Security Assertion Markup Language) 2.0 standard. SAML 2.0 enables connecting an Identity Provider (IdP) to your organization for an easier, more secure login experience.
SSO services permit a user to use one set of credentials (for example, a name or email address and password) to access multiple applications. The service authenticates the end user only once for all the applications the user has been given rights to and eliminates further prompts when the user switches applications during the same session. The benefits of SSO include:
* Streamlines user management across systems for organization owners.
* Enables organizations to enforce their own security policies (e.g., MFA).
* Removes the need for end users to remember and manage multiple passwords. Simplifies the end-user experience, by allowing sign in at one single access point across multiple applications.
### Just-in-time (JIT) provisioning
LangSmith supports Just-in-time provisioning when using SAML SSO. This allows someone signing in via SAML SSO to join the organization and selected workspaces automatically as a member.
JIT provisioning only runs for new users, that is, users who do not already have access to the organization with the same email address via a [different login method](/langsmith/authentication-methods#cloud).
### Login methods and access
Once you have completed your configuration of SAML SSO for your organization, users will be able to log in via SAML SSO in addition to [other login methods](/langsmith/authentication-methods#cloud), such as username/password or Google Authentication":
* When logged in via SAML SSO, users can only access the corresponding organization with SAML SSO configured.
* Users with SAML SSO as their only login method do not have [personal organizations](/langsmith/administration-overview#organizations).
* When logged in via any other method, users can access the organization with SAML SSO configured along with any other organizations they are a part of.
### Enforce SAML SSO only
User invites are not supported in organizations enforcing SAML SSO only. Initial workspace membership and role is determined by JIT provisioning, and changes afterwards can be managed in the UI.
For additional flexibility in automated user management, LangSmith supports SCIM.
To ensure users can only access the organization when logged in using SAML SSO and no other method, check the **Login via SSO only** checkbox and click **Save**. Once this happens, users accessing the organization that are logged-in via a non-SSO login method are required to log back in using SAML SSO. This setting can be switched back to allow all login methods by unselecting the checkbox and clicking **Save**.
You must be logged in via SAML SSO in order to update this setting to `Only SAML SSO`. This is to ensure the SAML settings are valid and avoid locking users out of your organization.
For troubleshooting, refer to the [SAML SSO FAQs](/langsmith/faq#saml-sso-faqs). If you have issues setting up SAML SSO, contact the LangChain support team via [support.langchain.com](https://support.langchain.com).
### Prerequisites
SAML SSO is available for organizations on the [Enterprise plan](https://www.langchain.com/pricing-langsmith). Please [contact sales](https://www.langchain.com/contact-sales) to learn more.
* Your organization must be on an Enterprise plan.
* Your Identity Provider (IdP) must support the SAML 2.0 standard.
* Only [`Organization Admins`](/langsmith/organization-workspace-operations#sso-and-authentication) can configure SAML SSO.
For instructions on using SCIM along with SAML for user provisioning and deprovisioning, refer to the [SCIM setup](#set-up-scim-for-your-organization).
### Initial configuration
For IdP-specific configuration steps, refer to one of the following:
* [Entra ID](#entra-id-azure)
* [Google](#google)
* [Okta](#okta)
1. In your IdP: Configure a SAML application with the following details, then copy the metadata URL or XML for step 3.
The following URLs are different for the US and EU regions. Ensure you select the correct link.
1. Single sign-on URL (or ACS URL):
* US: [https://auth.langchain.com/auth/v1/sso/saml/acs](https://auth.langchain.com/auth/v1/sso/saml/acs)
* EU: [https://eu.auth.langchain.com/auth/v1/sso/saml/acs](https://eu.auth.langchain.com/auth/v1/sso/saml/acs)
2. Audience URI (or SP Entity ID):
* US: [https://auth.langchain.com/auth/v1/sso/saml/metadata](https://auth.langchain.com/auth/v1/sso/saml/metadata)
* EU: [https://eu.auth.langchain.com/auth/v1/sso/saml/metadata](https://eu.auth.langchain.com/auth/v1/sso/saml/metadata)
3. Name ID format: email address.
4. Application username: email address.
5. Required claims: `sub` and `email`.
2. In LangSmith: Go to **Settings** -> **Members and roles** -> **SSO Configuration**. Fill in the required information and submit to activate SSO login:
1. Fill in either the `SAML metadata URL` or `SAML metadata XML`.
2. Select the `Default workspace role` and `Default workspaces`. New users logging in via SSO will be added to the specified workspaces with the selected role.
* `Default workspace role` and `Default workspaces` are editable. The updated settings will apply to new users only, not existing users.
* (Coming soon) `SAML metadata URL` and `SAML metadata XML` are editable. This is usually only necessary when cryptographic keys are rotated/expired or the metadata URL has changed but the same IdP is still used.
### Entra ID (Azure)
For additional information, see Microsoft's [documentation](https://learn.microsoft.com/en-us/entra/identity/enterprise-apps/add-application-portal-setup-sso).
**Step 1: Create a new Entra ID application integration**
1. Log in to the [Azure portal](https://portal.azure.com/#home) with a privileged role (e.g., `Global Administrator`). On the left navigation pane, select the `Entra ID` service.
2. Navigate to **Enterprise Applications** and then select **All Applications**.
3. Click **Create your own application**.
4. In the **Create your own application** window:
1. Enter a name for your application (e.g., `LangSmith`).
2. Select **Integrate any other application you don't find in the gallery (Non-gallery)**.
5. Click **Create**.
**Step 2: Configure the Entra ID application and obtain the SAML Metadata**
1. Open the enterprise application that you created.
2. In the left-side navigation, select **Manage** > **Single sign-on**.
3. On the Single sign-on page, click **SAML**.
4. Update the **Basic SAML Configuration**:
1. `Identifier (Entity ID)`:
* US: [https://auth.langchain.com/auth/v1/sso/saml/metadata](https://auth.langchain.com/auth/v1/sso/saml/metadata)
* EU: [https://eu.auth.langchain.com/auth/v1/sso/saml/metadata](https://eu.auth.langchain.com/auth/v1/sso/saml/metadata)
2. `Reply URL (Assertion Consumer Service URL)`:
* US: [https://auth.langchain.com/auth/v1/sso/saml/acs](https://auth.langchain.com/auth/v1/sso/saml/acs)
* EU: [https://eu.auth.langchain.com/auth/v1/sso/saml/acs](https://eu.auth.langchain.com/auth/v1/sso/saml/acs)
3. Leave `Relay State`, `Logout Url`, and `Sign on URL` empty.
4. Click **Save**.
5. Ensure required claims are present with **Namespace**: `http://schemas.xmlsoap.org/ws/2005/05/identity/claims`:
1. `sub`: `user.objectid`.
2. `emailaddress`: `user.userprincipalname` or `user.mail` (if using the latter, ensure all users have the `Email` field filled in under `Contact Information`).
3. (Optional) For SCIM, see the [setup documentation](/langsmith/user-management) for specific instructions about `Unique User Identifier (Name ID)`.
6. On the SAML-based Sign-on page, under **SAML Certificates**, copy the **App Federation Metadata URL**.
**Step 3: Set up LangSmith SSO Configuration**
Follow the instructions under [initial configuration](#initial-configuration) in the `Fill in required information` step, using the metadata URL from the previous step.
**Step 4: Verify the SSO setup**
1. Assign the application to users/groups in Entra ID:
1. Select **Manage** > **Users and groups**.
2. Click **Add user/group**.
3. In the **Add Assignment** window:
1. Under **Users**, click **None Selected**.
2. Search for the user you want to assign to the enterprise application, and then click **Select**.
3. Verify that the user is selected, and click **Assign**.
2. Have the user sign in via the unique login URL from the **SSO Configuration** page, or go to **Manage** > **Single sign-on** and select **Test single sign-on with (application name)**.
### Google
For additional information, see Google's [documentation](https://support.google.com/a/answer/6087519).
**Step 1: Create and configure the Google Workspace SAML application**
1. Make sure you're signed into an administrator account with the appropriate permissions.
2. In the Admin console, go to **Menu** -> **Apps** -> **Web and mobile apps**.
3. Click **Add App** and then **Add custom SAML app**.
4. Enter the app name and, optionally, upload an icon. Click **Continue**.
5. On the Google Identity Provider details page, download the **IDP metadata** and save it for Step 2. Click **Continue**.
6. In the `Service Provider Details` window, enter:
1. `ACS URL`:
* US: [https://auth.langchain.com/auth/v1/sso/saml/acs](https://auth.langchain.com/auth/v1/sso/saml/acs)
* EU: [https://eu.auth.langchain.com/auth/v1/sso/saml/acs](https://eu.auth.langchain.com/auth/v1/sso/saml/acs)
2. `Entity ID`:
* US: [https://auth.langchain.com/auth/v1/sso/saml/metadata](https://auth.langchain.com/auth/v1/sso/saml/metadata)
* EU: [https://eu.auth.langchain.com/auth/v1/sso/saml/metadata](https://eu.auth.langchain.com/auth/v1/sso/saml/metadata)
3. Leave `Start URL` and the `Signed response` box empty.
4. Set `Name ID` format to `EMAIL` and leave `Name ID` as the default (`Basic Information > Primary email`).
5. Click `Continue`.
7. Use `Add mapping` to ensure required claims are present:
1. `Basic Information > Primary email` -> `email`
**Step 2: Set up LangSmith SSO Configuration**
Follow the instructions under [initial configuration](#initial-configuration) in the `Fill in required information` step, using the `IDP metadata` from the previous step as the metadata XML.
**Step 3: Turn on the SAML app in Google**
1. Select the SAML app under `Menu -> Apps -> Web and mobile apps`
2. Click `User access`.
3. Turn on the service:
1. To turn the service on for everyone in your organization, click `On for everyone`, and then click `Save`.
2. To turn the service on for an organizational unit:
1. At the left, select the organizational unit then `On`.
2. If the Service status is set to `Inherited` and you want to keep the updated setting, even if the parent setting changes, click `Override`.
3. If the Service status is set to `Overridden`, either click `Inherit` to revert to the same setting as its parent, or click `Save` to keep the new setting, even if the parent setting changes.
3. To turn on a service for a set of users across or within organizational units, select an access group. For details, go to [Use groups to customize service access](https://support.google.com/a/answer/9050643).
4. Ensure that the email addresses your users use to sign in to LangSmith match the email addresses they use to sign in to your Google domain.
**Step 4: Verify the SSO setup**
Have a user with access sign in via the unique login URL from the **SSO Configuration** page, or go to the SAML application page in Google and click **TEST SAML LOGIN**.
### Okta
#### Supported features
* IdP-initiated SSO (Single Sign-On)
* SP-initiated SSO
* Just-In-Time provisioning
* Enforce SSO only
#### Configuration steps
For additional information, see Okta's [documentation](https://help.okta.com/en-us/content/topics/apps/apps_app_integration_wizard_saml.htm).
**Step 1: Create and configure the Okta SAML application**
Via Okta Integration Network (recommended)
1. Sign in to [Okta](https://login.okta.com/).
2. In the upper-right corner, select Admin. The button is not visible from the Admin area.
3. Select `Browse App Integration Catalog`.
4. Find and select the LangSmith application.
5. On the application overview page, select Add Integration.
6. Leave `ApiUrlBase` empty.
7. Fill in `AuthHost`:
* US: `auth.langchain.com`
* EU: `eu.auth.langchain.com`
8. (Optional, if planning to use [SCIM](#set-up-scim-for-your-organization) as well) Fill in `LangSmithUrl`:
* US: `api.smith.langchain.com`
* EU: `eu.api.smith.langchain.com`
9. Under Application Visibility, keep the box unchecked.
10. Select Next.
11. Select `SAML 2.0`.
12. Fill in `Sign-On Options`:
* `Application username format`: `Email`
* `Update application username on`: `Create and update`
* `Allow users to securely see their password`: leave **unchecked**.
13. Copy the **Metadata URL** from the **Sign On Options** page to use in the next step.
**Via Custom App Integration**
SCIM is not compatible with this method of configuration. Refer to [**Via Okta Integration Network**](#via-okta-integration-network).
1. Log in to Okta as an administrator, and go to the **Okta Admin console**.
2. Under **Applications** > **Applications** click **Create App Integration**.
3. Select **SAML 2.0**.
4. Enter an `App name` (e.g., `LangSmith`) and optionally an **App logo**, then click **Next**.
5. Enter the following information in the **Configure SAML** page:
1. `Single sign-on URL` (`ACS URL`). Keep `Use this for Recipient URL and Destination URL` checked:
* US: [https://auth.langchain.com/auth/v1/sso/saml/acs](https://auth.langchain.com/auth/v1/sso/saml/acs)
* EU: [https://eu.auth.langchain.com/auth/v1/sso/saml/acs](https://eu.auth.langchain.com/auth/v1/sso/saml/acs)
2. `Audience URI (SP Entity ID)`:
* US: [https://auth.langchain.com/auth/v1/sso/saml/metadata](https://auth.langchain.com/auth/v1/sso/saml/metadata)
* EU: [https://eu.auth.langchain.com/auth/v1/sso/saml/metadata](https://eu.auth.langchain.com/auth/v1/sso/saml/metadata)
3. `Name ID format`: **Persistent**.
4. `Application username`: `email`.
5. Leave the rest of the fields empty or set to their default.
6. Click **Next**.
6. Click **Finish**.
7. Copy the **Metadata URL** from the **Sign On** page to use in the next step.
**Step 2: Set up LangSmith SSO Configuration**
Follow the instructions under [initial configuration](#initial-configuration) in the **Fill in required information** step, using the metadata URL from the previous step.
**Step 3: Assign users to LangSmith in Okta**
1. Under **Applications** > **Applications**, select the SAML application created in Step 1.
2. Under the **Assignments** tab, click **Assign** then either **Assign to People** or **Assign to Groups**.
3. Make the desired selection(s), then **Assign** and **Done**.
**Step 4: Verify the SSO setup**
Have a user with access sign in via the unique login URL from the `SSO Configuration` page, or have a user select the application from their Okta dashboard.
#### SP-initiated SSO
Once service-provider–initiated SSO is configured, users can sign in using a unique login URL. You can find this in the LangSmith UI under **Organization members and roles** then **SSO configuration**.
## Set up SCIM for your organization
System for Cross-domain Identity Management (SCIM) is an open standard that allows for the automation of user provisioning. Using SCIM, you can automatically provision and de-provision users in your LangSmith [organization and workspaces](/langsmith/administration-overview), keeping user access synchronized with your organization's identity provider.
SCIM is available for organizations on the [Enterprise plan](https://www.langchain.com/pricing). [Contact sales](https://www.langchain.com/contact-sales) to learn more.
SCIM is available on Helm chart versions 0.10.41 (application version 0.10.108) and later.
SCIM support is API-only (see instructions below).
SCIM eliminates the need for manual user management and ensures that user access is always up-to-date with your organization's identity system. This allows for:
* **Automated user management**: Users are automatically added, updated, and removed from LangSmith based on their status in your IdP.
* **Reduced administrative overhead**: No need to manage user access manually across multiple systems.
* **Improved security**: Users who leave your organization are automatically deprovisioned from LangSmith.
* **Consistent access control**: User attributes and group memberships are synchronized between systems.
* **Scaling team access control**: Efficiently manage large teams with many workspaces and custom roles.
* **Role assignment**: Select specific [Organization Roles](/langsmith/rbac#organization-roles) and [Workspace Roles](/langsmith/rbac#workspace-roles) for groups of users.
### Requirements
#### Prerequisites
* Your organization must be on an Enterprise plan.
* Your Identity Provider (IdP) must support SCIM 2.0.
* Only [Organization Admins](/langsmith/administration-overview#organization-roles) can configure SCIM.
* For cloud customers: [SAML SSO](#set-up-saml-sso-for-your-organization) must be configurable for your organization.
* For self-hosted customers: [OAuth with Client Secret](/langsmith/self-host-sso#with-secret) authentication mode must be enabled.
* For self-hosted customers, network traffic must be allowed from the identity provider to LangSmith:
* Microsoft Entra ID supports allowlisting IP ranges or an agent-based solution to provide connectivity.
([details](https://learn.microsoft.com/en-us/entra/identity/app-provisioning/use-scim-to-provision-users-and-groups#ip-ranges)).
* Okta supports allow-listing IPs or domains ([details](https://help.okta.com/en-us/content/topics/security/ip-address-allow-listing.htm))
or an agent-based solution ([details](https://help.okta.com/en-us/content/topics/provisioning/opp/opp-main.htm)) to provide connectivity.
SCIM connections typically require HTTP/1.1 or later. If your client uses HTTP/1.0, you may encounter a `426 Upgrade Required` error.
#### Role precedence
When a user belongs to multiple groups for the same workspace, the following precedence applies:
1. **Organization Admin groups** take highest precedence. Users in these groups will be `Admin` in all workspaces.
2. **Most recently created workspace-specific group** takes precedence over other workspace groups.
When a group is deleted or a user is removed from a group, their access is updated according to their remaining group membership, following the precedence rules.
SCIM group membership will override manually assigned roles or roles assigned via Just-in-time (JIT) provisioning. We recommend disabling JIT provisioning to avoid conflicts.
#### Email verification
In cloud only, creating a new user with SCIM triggers an email to the user.
They must verify their email address by clicking the link in this email.
The link expires in 24 hours, and can be resent if needed by removing and re-adding the user via SCIM.
### Attributes and mapping
#### Group naming convention
Renaming groups is **not** supported via SCIM. Group names are persistent because they must match role names and/or workspace names in LangSmith.
Group membership maps to LangSmith workspace membership and workspace roles with a specific naming convention:
**Organization Admin Groups**
Format: `Organization Admin` or `Organization Admins`
Examples:
* `LS:Organization Admins`
* `Groups-Organization Admins`
* `Organization Admin`
**Workspace-Specific Groups**
Format: `::`
Examples:
* `LS:Organization User:Production:Annotators`
* `Groups-Organization User:Engineering:Developers`
* `Organization User:Marketing:Viewers`
### Mapping
While specific instructions depending on the identity provider may vary, these mappings show what is supported by the LangSmith SCIM integration:
#### User attributes
| **LangSmith App Attribute** | **Identity Provider Attribute** | **Matching Precedence** |
| ------------------------------ | ----------------------------------------------------- | ----------------------- |
| `userName`1 | email address | |
| `active` | `!deactivated` | |
| `emails[type eq "work"].value` | email address2 | |
| `name.formatted` | `displayName` OR `givenName + familyName`3 | |
| `givenName` | `givenName` | |
| `familyName` | `familyName` | |
| `externalId` | `sub`4 | 1 |
1. `userName` is not required by LangSmith
2. Email address is required
3. Use the computed expression if your `displayName` does not match the format of `Firstname Lastname`
4. To avoid inconsistency, this should match the SAML `NameID` assertion for cloud customers, or the `sub` OAuth2.0 claim for self-hosted.
#### Group attributes
| **LangSmith App Attribute** | **Identity Provider Attribute** | **Matching Precedence** |
| --------------------------- | ------------------------------- | ----------------------- |
| `displayName` | `displayName`1 | 1 |
| `externalId` | `objectId` | |
| `members` | `members` | |
1. Groups must follow the naming convention described in the [Group Naming Convention](#group-naming-convention) section.
If your company has a group naming policy, you should instead map from the `description` identity provider attribute and
set the description based on the [Group Naming Convention](#group-naming-convention) section.
### Step 1 - configure SAML SSO (Cloud only)
There are two scenarios for [SAML SSO](#set-up-saml-sso-for-your-organization) configuration:
1. If SAML SSO is already configured for your organization, you should skip the steps to initially add the application ([Add application from Okta Integration Network](#add-application-okta-oin) or [Create a new Entra ID application integration](#create-application-entra-id)), as you already have an application configured and just need to enable provisioning.
2. If you are configuring SAML SSO for the first time alongside SCIM, first follow the instructions to [set up SAML SSO](#set-up-saml-sso-for-your-organization), *then* follow the instructions here to enable SCIM.
#### NameID format
LangSmith uses the SAML NameID to identify users. The NameID is a required field in the SAML response and is case-insensitive.
The NameID must:
1. Be unique to each user.
2. Be a persistent value that never changes, such as a randomly generated unique user ID.
3. Match exactly on each sign-in attempt. It should not rely on user input.
The NameID should not be an email address or username because email addresses and usernames are more likely to change over time and can be case-sensitive.
The NameID format must be `Persistent`, unless you are using a field, like email, that requires a different format.
### Step 2 - disable JIT provisioning
Before enabling SCIM, disable [Just-in-time (JIT) provisioning](/langsmith/user-management#just-in-time-jit-provisioning) to prevent conflicts between automatic and manual user provisioning.
#### Disabling JIT for cloud
Use the `PATCH /orgs/current/info` [endpoint](https://api.smith.langchain.com/redoc#tag/orgs/operation/update_current_organization_info_api_v1_orgs_current_info_patch):
```bash theme={null}
curl -X PATCH $LANGCHAIN_ENDPOINT/orgs/current/info \
-H "X-Api-Key: $LANGCHAIN_API_KEY" \
-H "Content-Type: application/json" \
-d '{"jit_provisioning_enabled": false}'
```
#### Disabling JIT for Self-Hosted
As of LangSmith chart version **0.11.14**, you can disable JIT provisioning for your self-hosted organization using SSO. To disable, set the following values:
```yaml theme={null}
commonEnv:
- name: SELF_HOSTED_JIT_PROVISIONING_ENABLED
value: "false"
```
### Step 3 - generate SCIM bearer token
In self-hosted environments, the full URL below may look like `https://langsmith.yourdomain.com/api/v1/platform/orgs/current/scim/tokens` (without a subdomain, note the `/api/v1` path prefix) or `https://langsmith.yourdomain.com/subdomain/api/v1/platform/orgs/current/scim/tokens` (with a subdomain) - see the [ingress docs](/langsmith/self-host-ingress) for more details.
Generate a SCIM Bearer Token for your organization. This token will be used by your IdP to authenticate SCIM API requests. Ensure env vars are set appropriately, for example:
```bash theme={null}
curl -X POST $LANGCHAIN_ENDPOINT/v1/platform/orgs/current/scim/tokens \
-H "X-Api-Key: $LANGCHAIN_API_KEY" \
-H "Content-Type: application/json" \
-d '{"description": "Your description here"}'
```
Note that the SCIM Bearer Token value is not available outside of the response to this request. These additional endpoints are present:
* `GET /v1/platform/orgs/current/scim/tokens`
* `GET /v1/platform/orgs/current/scim/tokens/{scim_token_id}`
* `PATCH /v1/platform/orgs/current/scim/tokens/{scim_token_id}` (only the `description` field is supported)
* `DELETE /v1/platform/orgs/current/scim/tokens/{scim_token_id}`
### Step 4 - configure your identity provider
If you use Azure Entra ID (formerly Azure AD) or Okta, there are specific instructions for identity provider setup (refer to [Azure Entra ID](#azure-entra-id-configuration-steps), [Okta](#okta)). The requirements and steps above are applicable for all identity providers.
#### Azure entra ID configuration steps
For additional information, see Microsoft's [documentation](https://learn.microsoft.com/en-us/entra/identity/app-provisioning/user-provisioning).
In self-hosted installations, the `oid` JWT claim is used as the `sub`.
See [this Microsoft Learn link](https://learn.microsoft.com/en-us/answers/questions/5546297/how-to-link-oidc-users-with-scim)
and [the related configuration instructions](/langsmith/self-host-sso#override-sub-claim) for additional details.
**Step 1: Configure SCIM in your Enterprise Application**
1. Log in to the [Azure portal](https://portal.azure.com/#home) with a privileged role (e.g., `Global Administrator`).
2. Navigate to your existing LangSmith Enterprise Application.
3. In the left-side navigation, select **Manage** > **Provisioning**.
4. Click **Get started**.
**Step 2: Configure Admin credentials**
1. Under **Admin Credentials**:
* **Tenant URL**:
* US: `https://api.smith.langchain.com/scim/v2`
* EU: `https://eu.api.smith.langchain.com/scim/v2`
* Self-hosted: `/scim/v2`
* **Secret Token**: Enter the SCIM Bearer Token generated in Step 3.
2. Click **Test Connection** to verify the configuration.
3. Click **Save**.
**Step 3: Configure Attribute Mappings**
Configure the following attribute mappings under `Mappings`:
**User Attributes**
Set **Target Object Actions** to `Create` and `Update` (start with `Delete` disabled for safety):
| **LangSmith App Attribute** | **Microsoft Entra ID Attribute** | **Matching Precedence** |
| :----------------------------: | :---------------------------------------------------: | :---------------------: |
| `userName` | `userPrincipalName` | |
| `active` | `Not([IsSoftDeleted])` | |
| `emails[type eq "work"].value` | `mail`1 | |
| `name.formatted` | `displayName` OR `Join(" ", [givenName], [surname])`2 | |
| `externalId` | `objectId`3 | 1 |
1. User's email address must be present in Entra ID.
2. Use the `Join` expression if your `displayName` does not match the format of `Firstname Lastname`.
3. To avoid inconsistency, this should match the SAML NameID assertion and the `sub` OAuth2.0 claim. For SAML SSO in cloud, the `Unique User Identifier (Name ID)` required claim should be `user.objectID` and the `Name identifier format` should be `persistent`.
**Group Attributes**
Set **Target Object Actions** to `Create` and `Update` only (start with `Delete` disabled for safety):
| **LangSmith App Attribute** | **Microsoft Entra ID Attribute** | **Matching Precedence** |
| :-------------------------: | :------------------------------: | :---------------------: |
| `displayName` | `displayName`1 | 1 |
| `externalId` | `objectId` | |
| `members` | `members` | |
1. Groups must follow the naming convention described in the [Group Naming Convention](#group-naming-convention) section.
If your company has a group naming policy, you should instead map from the `description` Microsoft Entra ID Attribute and
set the description based on the [Group Naming Convention](#group-naming-convention) section.
**Step 4: Assign Users and Groups**
1. Under **Applications** > **Applications**, select your LangSmith Enterprise Application.
2. Under the **Assignments** tab, click **Assign** then either **Assign to People** or **Assign to Groups**.
3. Make the desired selection(s), then **Assign** and **Done**.
**Step 5: Enable Provisioning**
1. Set **Provisioning Status** to `On` under **Provisioning**.
2. Monitor the initial sync to ensure users and groups are provisioned correctly.
3. Once verified, enable `Delete` actions for both User and Group mappings.
For troubleshooting, refer to the [SAML SSO FAQs](/langsmith/faq#saml-sso-faqs). If you have issues setting up SCIM, contact the LangChain support team via [support.langchain.com](https://support.langchain.com).
#### Okta configuration steps
You must use the [Okta Lifecycle Management](https://www.okta.com/products/lifecycle-management/) product. This product tier is required to use SCIM on Okta.
Supported features
* Create users
* Update user attributes
* Deactivate users
* Group push (**without group renaming**)
* Import users
* Import groups
Step 1: Add application from Okta Integration Network
If you have already configured SSO login via SAML (cloud) or OAuth2.0 with OIDC (self-hosted), skip this step.
See [SAML SSO setup](#okta) for cloud or [OAuth2.0 setup](/langsmith/self-host-sso#okta-idp-setup) for self-hosted.
**Step 2: Configure API Integration**
1. In the General tab, ensure the `LangSmithUrl` is filled in according to the instructions from [Step 1](#add-application-okta-oin)
2. In the Provisioning tab, select `Integration`.
3. Select `Edit` then `Enable API integration`.
4. For API Token, paste the SCIM token you [generated above](#step-3-generate-scim-bearer-token).
5. Keep `Import Groups` checked.
6. To verify the configuration, select Test API Credentials.
7. Select Save.
8. After saving the API integration details, new settings tabs appear on the left. Select `To App`.
9. Select Edit.
10. Select the Enable checkbox for Create Users, Update Users, and Deactivate Users.
11. Select Save.
12. Assign users and/or groups in the Assignments tab. Assigned users are created and managed in your LangSmith group.
**Step 3: Configure User Provisioning Settings**
1. Configure provisioning: under `Provisioning > To App > Provisioning to App`, click `Edit`, then check `Create Users`, `Update User Attributes`, and `Deactivate Users`.
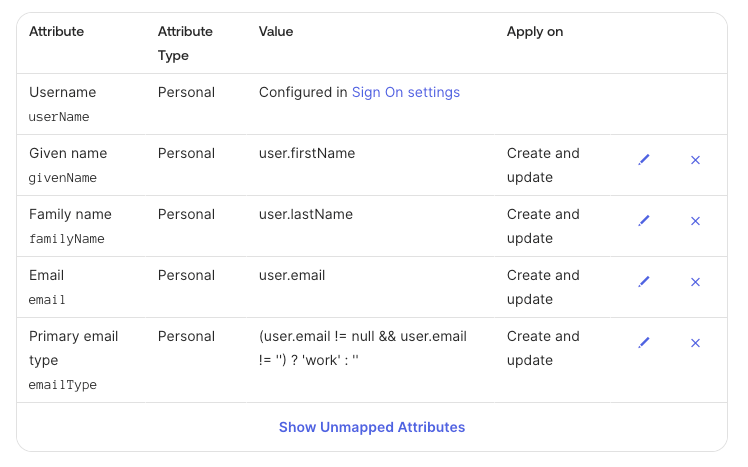
2. Under ` Attribute Mappings`, set the user attribute mappings as shown below, and delete the rest:
 **Step 4: Push Groups**
Okta does not support group attributes besides the group name itself, so group name *must* follow the naming convention described in the [Group Naming Convention](#group-naming-convention) section.
Follow Okta's [Enable Group Push](https://help.okta.com/en-us/content/topics/users-groups-profiles/usgp-enable-group-push.htm) instructions to configure groups to push by name or by rule.
#### Other identity providers
Other identity providers have not been tested but may function depending on their SCIM implementation.
***
[Edit this page on GitHub](https://github.com/langchain-ai/docs/edit/main/src/langsmith/user-management.mdx) or [file an issue](https://github.com/langchain-ai/docs/issues/new/choose).
[Connect these docs](/use-these-docs) to Claude, VSCode, and more via MCP for real-time answers.
**Step 4: Push Groups**
Okta does not support group attributes besides the group name itself, so group name *must* follow the naming convention described in the [Group Naming Convention](#group-naming-convention) section.
Follow Okta's [Enable Group Push](https://help.okta.com/en-us/content/topics/users-groups-profiles/usgp-enable-group-push.htm) instructions to configure groups to push by name or by rule.
#### Other identity providers
Other identity providers have not been tested but may function depending on their SCIM implementation.
***
[Edit this page on GitHub](https://github.com/langchain-ai/docs/edit/main/src/langsmith/user-management.mdx) or [file an issue](https://github.com/langchain-ai/docs/issues/new/choose).
[Connect these docs](/use-these-docs) to Claude, VSCode, and more via MCP for real-time answers.